Octopus Heat Pump Initial Steps Review – we recently had a new central heating system fitted by Octopus Energy with the aid of the Boiler Upgrade Scheme (BUS) – a government grant for a heat pump. We have reviewed the initial steps below (and later reviewed the actual installation as well as a breakdown of the Tariff and Costs here.)
**If you are a new customer to Octopus you can sign up using our link and we both get £50!**
By way of introduction to our new heating project, thought I’d give a bit of a run through of our house setup and current heating, or lack thereof. We are in a rural location on top of a hill, our house was built in 1914 and is mostly solid brick construction with no cavity to insulate. It’s had a loft conversion fairly recently, so the roof is very well insulated. Most of the ground floor floors are uninsulated and most windows are recent timber double or triple glazing. A recent single storey kitchen extension is very well insulated. We have been heating our house with a solid fuel Aga, an open fire and selected rooms/times with electric panel radiators.
We have had no working central heating system for over 5 years as the previous system died and was way beyond repair. The pipework/radiators/water cylinder from the previous system are all still present. All of which we presumed to be in serviceable condition as there were no leaks and had been working ok. A note on pipework here – which I may touch on again later – heat pump systems ideally like to pump a lot of lower temperature water through the system, so the bigger the better! By that I mean, in an ideal world there should be 22mm pipes (**Walls Sausage size) as the main backbone of the system, with 15mm (**Chipolata) to each individual radiator, and ideally copper piping. Many newer houses have had microbore piping installed (**Pepperami) this can be a problem for easy installations, I believe larger microbore has been accepted in some installations, smaller diameter needs replacement to be suitable for a heat pump. I would suggest contacting Octopus for their current guidelines.
**Well known sausages used for scale, other brands are available 🙂
I’ve liked Octopus’ forward thinking approach to electric tariffs, so thought we would dive on in there and see what their heat pump installation process (or journey as they insist on calling it) is like. When we started out, the government were offering a £5k discount through the BUS scheme, this did increase to £7.5k shortly before our installation was due, and this seems to have been a bit of a tipping point in persuading greater take up.
Our ‘journey’ started by booking in a survey. I assumed this was going to be a double glazing style sales pitch. Currently Octopus request a £500 refundable deposit before the survey. I guess it’s to check you’re serious about going ahead, but it is refundable at any point up to shortly before your installation. Read on to see how it went.
July 2023 – Survey Day
Survey day started with an on time arrival by Craig, our Octopus survey dude, he had messaged an ETA on a previous day. Always a good start, I’m not a massive fan of people visiting and get unreasonably irritated if they’re late, maybe I’m just antisocial 🙂
Introductions done, he explained what the plan for the survey was. I then gave him a guided tour of the house, inside and out. We discussed our current heating system, or lack thereof. I would say we are quite unusual in that we have a fully plumbed heating system, with air source heat pump. The catch is, it died 5 years ago. This didn’t phase him, others have looked at me like I have two heads when explaining this I’ll return to this point a little later, with an addendum on the BUS.
The survey was incredibly comprehensive, far more so than I was expecting, and turned out not to be a sales pitch at all, just a fact finding mission, with pricing to follow. We were aware of the estimated time beforehand. I’ll run through a few of the points covered.
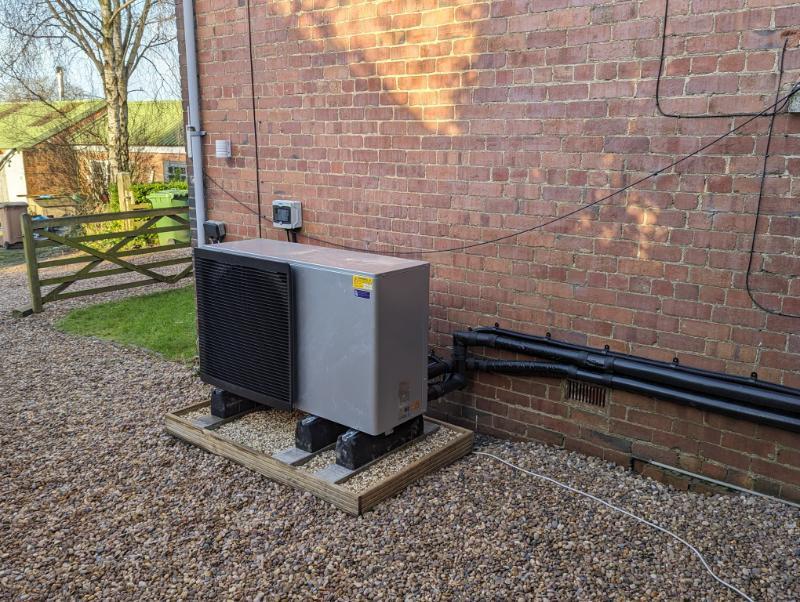
- Siting of heat pump, space around it, pipe, cable routing, are we in a conservation area, is it far enough from moany neighbours, etc. We had a long discussion about the best pipe routing between the heat pump and cylinder. It was far from an easy route as they are rather large pipes (2x80mm) once you factor in the pipe insulation. That said, a quite agreeable position was arrived at, with an eye to not looking awful in my shiny new future-kitchen!
- Heat loss calculations, these were a huge piece of work (not for me, I just drank coffee, chatted and attempted to answer any questions). They go into the energy efficiency of each room and the house as a whole. We discussed the actual insulation and windows in each room, not just a generic tick box of “yes, there is some probably”. They are far more in depth than the EPC we had carried out and IMHO far more accurate! Our house is a mix of old and new, insulated and not. Any new walls, roofs and floors are insulated, the original house is solid brick wall with no insulation. For numerous reasons we won’t be insulating the solid walls.
- Water flow and pressure were measured using a contraption on the outside tap. I think this can cause complications if either are too low
- Measuring of current draw of your house with typical appliances on (cough cough, hot tub).
- Noting we are on a looped electric supply, the neighbour’s electric meter is attached to ours. Seemed to think this shouldn’t be a problem and the DNO (Distribution Network Operator – ie Northern Powergrid) should fix this free of charge as it’s a bit dated configuration. (In the end it was decided this wasn’t an issue).
- Water cylinder – Our previous was an unvented 80-100l (not entirely sure) and regularly ran out of water at inconvenient moments. It was situated in an airing cupboard in the bathroom, they seemed to think there was enough space to put the new one there.
The heat loss calculations are a biggy, once these are all input then this is a bit of a crunch moment…..the survey says……..Yes, in our case. But this is the point in proceedings where it could have all come to a grinding halt of disappointment. Now this I am told is deliberate, and intended to ensure there isn’t a flood of grumpy people who have just spend a lot of money on a heating system that doesn’t adequately heat!
After this, our surveyor took me on a walk-through of all the changes we would need to make to our existing heating system. Radiators, only two get to stay, these were already large, all the others are recommended/insisted on replacement.
Now, I have mentioned the time taken on the survey. It is a long survey, but I don’t intend this to be a negative point. There was plenty of discussion between us, especially with regards to minimising disruption, siting the (larger) radiators in sensible locations, and yes, there were little compromises to be made here and there. He was also flexible in the recommendations, they won’t insist on putting an inappropriate radiator somewhere if this can be shuffled/resized and still be suitable.
By way of winding up the survey, he proceeded to take photos, millions of photos, also video walk-through of our house. Doing his piece to camera as he went, dictating info about pipe/wiring routings, radiators, etc. Presumably for the installers to reference before attending.
Quote Received
A week or so after our survey we received our quote through from Octopus. Including our radiator schedule, heat loss calculations, estimated heating costs/electricity consumption. Screenshots of some below:
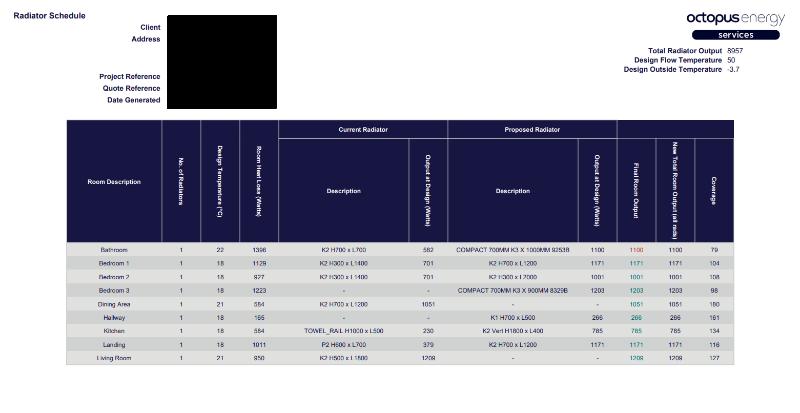
For us, looking at the price quoted and in conjunction with the BUS available at the time, it felt very competitive and a definite yes. Without listing exact figures as every installation is going to vary, it was very much less than if we had an LPG system installed for example as we aren’t on mains gas.
So, we signed on the virtual dotted line, signed a bit more for Octopus to apply for BUS on our behalf, and agreed pre-install and installation dates!
October 2023 – Pre-Install Day
Today was our “pre-installation” appointment day. This was preceded by a phone call the evening before advising us of an ETA with a 1 hr window. Yes, he was on time.
I wasn’t really sure what the point of this visit was, after all, the survey seemed very comprehensive initially. I assumed it was a rubber stamping, slightly pointless exercise……..it turns out not!
Now, I would say that our installation is more involved than most. Probably at the more complicated end of the installations Octopus are carrying out, currently at least. Whilst we have an existing (not working) heating system, we are only actually keeping 2 of the existing radiators. Everything else is changing, radiators, cylinder, heat source obviously! We have also added a new extension so need a means of heating that, oh, and the loft extension has had an electric heater in since it was done, so there’s that too.
Very much like the survey, it consisted of a walk-through of all the elements of the installation. This time through the eyes of an installer, so considering more technical details and anything the survey might not have thought about.
Our new extension was, at that point, being plastered, so I chose to leave the ceiling under the bathroom and hot water cylinder open for access. Our bathroom above has a tiled floor which I didn’t want disturbed. Whilst I am sure they could work around it being covered up, installation was only 3 weeks away, so no point making things difficult.
So, it quickly became apparent things were changing! I don’t mind admitting this concerned me at this point(I don’t like change!). But having time to reflect, they were changing for the better. This all seems to be aimed at creating a better functioning/performing system and hopefully less hiccups and surprises on installation week.
Have a click through if you are looking for Heat pump installation in Edinburgh.
What’s changing…….
Thermostat location, the survey suggested the kitchen, it’s near the cylinder and heat pump piping. Seemed fine to me, agreed to it. Installer says he’d rather not, concerned the kitchen will warm up cooking meals, also it’s newly built and very well insulated. So heating turns off, leaving the rest of the house colder than we would like. Makes perfect sense really. So, a new location was agreed upon, the lounge, or maybe the dining room, he left it with me to ponder. It’s worth noting he didn’t refuse to put it in the previous spot, just advised against it, seemed keen to emphasize the installation should work for us, not just make the installers life easy 🙂
Pipework. So, we currently have 15mm pipe work to all radiators. It’s probably been in 30-40 years as a guess. He wants to change the main runs from the cylinder to downstairs to 22mm. Might not sound very exciting, but it’s for the same reason we need larger radiators with ASHPs, more water flow. They’ll follow the same route as existing pipes so won’t look much different in the end, but I expected more upheaval for access to do this. It can’t be a bad thing (unless the price goes up) I reckon, we get new pipework and the system increases in efficiency.
Pipework routing for one of the new kitchen radiators. The survey said they should go under my floor which I am about to tile. I never really liked this plan and I am very pleased to say he didn’t either! So have agreed a new route which I can box in afterwards.
Upstairs, the changes continue…….
Our loft room had a note about reinforcement of a stud wall for the new K3 radiator (big and heavy). That’s a no, he believes they can be supplied with feet, this removes the need to pull apart my wall and disturbing a grumpy teenager more than necessary. Still right against the wall though, which is good.
Bathroom, same radiator but…..it only just fits. Went through various suggestions including two smaller ones. Having considered both and having a trial sit on the toilet (a proposed new location for a smaller one), decided to remain with just the one. It’s jolly close to the door so had a discussion about removing a row of tiles behind it. I agreed as I can see the logic, and it will work with the bathroom design. That was a job for me sadly. They would have fitted without doing this, but it makes sense to get it done beforehand, will give a better finish. I still think this radiator is huge, but apparently this is because they design bathrooms to maintain 23 degrees. My house was usually about 13 degrees, so that sounds positively tropical!
Landing radiator, I was to move our huge mirror upwards, to allow a taller radiator. Installer changed the agreed radiator to a wider one instead. No more moving mirror= less work for me.
The final change to the plan for now, is another teenagers room, urgh! So, the survey put a very long and short one under the window, replacing the existing less long and short one. It was a struggle getting one to fit that met the heating requirements. That was pretty much an immediate no from the installer, not enough space for airflow. Oh! Now, we went with this as I think the survey was looking to minimize changes and presumably cost, so this appeared to be the only viable option. So, what now, was a bit concerned at this point, this room is…..how shall we put it…..a bit full! He came up with a more normal size of radiator and said where, it can go wherever you like. Now, I didn’t realize that was an option before. Following a bit of head scratching we came up with the former fireplace wall, it should work well and not interrupt a long wall that the bed is against for example.
Phew! It was again, a very comprehensive visit. I feel that this was all worthwhile time spent, for us and Octopus. It’s reassuring that the installer will have a sensible conversation about the best way of doing things. Explaining if necessary, but not treating you like a 2 year old, don’t you just hate that?
I feel like this contributed to a better end result – and fine tuned the plan – all be it with what feels like some larger changes. I anticipated some more upheaval from our side, with the additional pipework and new radiator location upstairs, but didn’t resent it at this stage as it felt worthwhile/sensible. He did increase the allocated time to the job from 5 days to 7 days, and added more pipework. Now, I assumed this wouldn’t change the cost at this point (spoiler alert, it didn’t), 3.5 weeks to installation commencing…
I wanted to add a bit of an addendum to this post as I have realised that I haven’t really mentioned the Octopus Heat Pump team. We mainly spoke to and emailed Aaron who was professional, but also warm and friendly which goes a long way to make you feel at ease I think. Octopus definitely has a more modern ‘people first’ approach which is really refreshing to deal with!
**If you are a new customer to Octopus you can sign up using our link and we both get £50!**
Please see all our posts in our Octopus Heat Pump series:
Actual Installation of Heat Pump
Octopus Tariff and Running Costs for the Heat Pump
Also, since having our heat pump installed, we also now have the Octopus EV Charger, and you can read our review about that here.